How to set up a log relay Part 1 - Server Setup

A SIEM (Security Information and Event Management) tool like Wazuh is only as good as the logs it ingests. It's important to gather useful information from your critical assets, and endpoints are some of the most important assets we manage. But how do you gather logs from those devices when they're constantly moving around?
Background
I've been running Wazuh as the SIEM for my homelab for two years now, but have only ever been able to consistenty monitor machines that lived inside my homelab. I have always really wanted to be able to monitor logs from my personal devices even when I'm away from home. This is important to me because being unable to monitor logs generated when I'm away from home creates a huge blind spot in my security posture.
At one point, I tried to solve this problem by using Tailscale to connect my remote devices directly to the Wazuh server, but I didn't like that method very much because it required me to keep Tailscale on all the time. Since I use other VPNs, that didn't work well for me, as Tailscale and the VPNs would conflict with one another.
I eventually decided I would need to make the log ingestion ports publicly accessible, but I wanted to do as much as I could to reduce the risks associated with that exposure, at which point I decided to set up mTLS. In this blog, I'll show you how to do that as well.
Why use mTLS?
To answer the question of why I used mTLS, I'll first explain what mTLS is. Cloudflare's website states it this way:
"mTLS ensures that the parties at each end of a network connection are who they claim to be"
This means that when a remote device connects to the server, both the server and the device authenticate one another to ensure they can trust one another. Another excerpt from Cloudflare's explanation of mTLS says:
"mTLS is often used in a Zero Trust security framework to verify users, devices, and servers within an organization. . . Zero Trust means that no user, device, or network traffic is trusted by default, an approach that helps eliminate many security vulnerabilities."
These security benefits are massively helpful when you're exposing a service publicly. In the case of log collection, they make it possible for a server to receive logs from anywhere, but not from just anyone. They also make it possible for a device to be just as careful about where it sends logs.
Because a SIEM collects all kinds of information (including some potentially sensitive information) from the endpoints it monitors, I find it super important to enforce these zero trust principles in the connection between the server and its agents. With that, let's jump into how to set it up!
Tutorial Overview
Before your fingers hit the keyboard, begin with the end in mind by reviewing this list of steps.
- Set up PKI (Public Key Infrastructure)
- Create a CA (Certificate Authority)
- Configure relay server and HAProxy
- Pick and install an OS
- Apply security hardening
- Configure HAProxy
- Networking + DNS setup
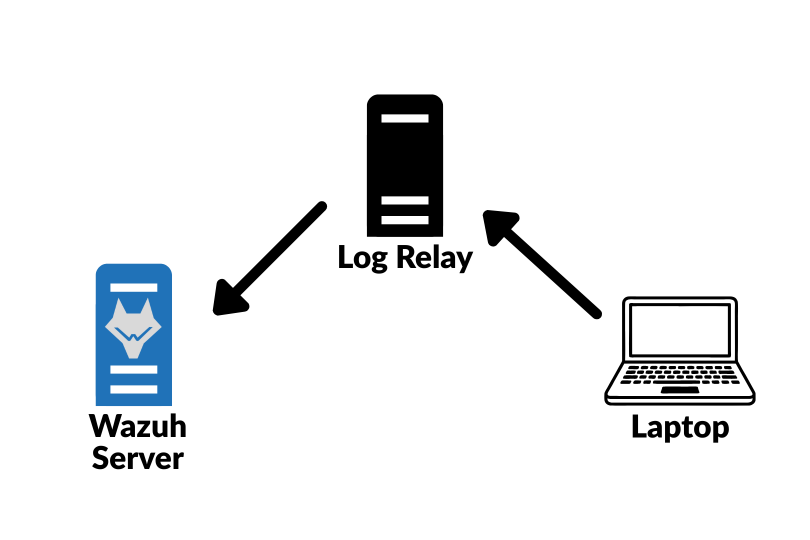
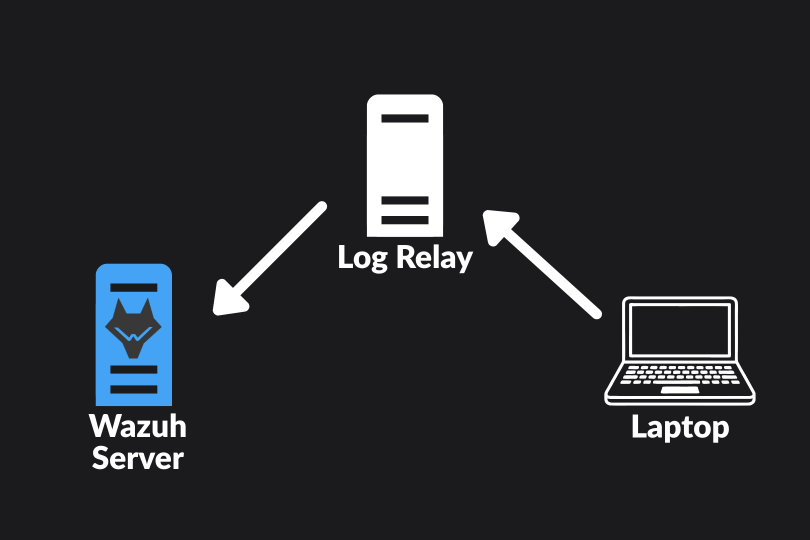
Diagram
This is a rough visual diagram of the setup you'll configure. Hopefully this helps you picture what we're trying to accomplish.
Prerequisites
These are the resources/things you'll need to set this up.
- Your own domain OR a machine with a static public IP address
- I know this prerequisite can be discouraging if you don't already have one, but I HIGHLY recommend getting one. It'll open up your home-labbing opportunities so much, and it's not very expensive.
- If you do not have your own domain and don't want to purchase one, you have the option of setting up your log relay on a server with a static public IP address such as a VPS in AWS, Linode, or similar cloud-hosting service. However, this is not my recommended method, and I would strongly suggest purchasing a domain. (It'll probably be cheaper than the alternative anyway).
- Access to two or three separate machines (virtual or physical)
- One will be your SIEM server (I'll use Wazuh in my examples), one will be the certificate authority (CA) for your PKI, and the other will be the relay that receives and forwards your logs to the SIEM server.
- Note: You can technically run the CA on one of the other two servers, but it's a little risky to combine them.
- An endpoint you want to monitor
- If you just want to set this up as a PoC, you can use any physical or virtual machine. However, it is designed with mobile devices like personal laptops in mind. They're the ones that will get the most use from a setup like this.
Step 1 - Set up PKI (Public Key Infrastructure)
Let's start by creating your certificate authority. Your certificate authority is critical in issuing and signing certificates that will be used in mTLS. Here, it's important to understand that your certificate authority isn't necessarily a machine. It's essentially a CA private key and a CA certificate.
IBM's website has a great, in-depth explanation of TLS and public key cryptography that will make a great read if these concepts are new to you.
You may also benefit from reading RedHat's explanation of public key cryptography.
Your CA private key and CA certificate are just files and they can live anywhere you want. Often, it's a good idea to store them encrypted in an offline container like a USB drive. However, you will need a machine to access them any time you want to issue or sign a new certificate, so you can keep them on the machine you'll be using to sign and issue certificates. It's up to you how you want to handle it, but the latter option is likely appropriate for a homelab setup.
To create them, use these commands:
-
Create your CA private key:
openssl genrsa -out mtls-ca.key 4096
chmod 600 mtls-ca.key
This will generate a file called
mtls-ca.key.This key does NOT need to be copied anywhere else, and you should only copy it if you have to back it up and if you're extremely careful to protect it.
-
Create your CA certificate (Change "YourOrg" and "relay-mtls-ca" to the names you prefer.)
This command includes several flags (parameters), so click here for a quick breakdown of the whole command if you're interested:
Flag Meaning Purpose in This Command openssl reqInvokes the OpenSSL certificate request utility. Used to create and process certificate requests and self-signed certificates. -x509Outputs a self-signed X.509 certificate instead of a CSR. Creates a self-signed Certificate Authority (CA) certificate directly, rather than generating a certificate signing request. -newGenerates a new certificate request or certificate. Creates a new certificate rather than processing an existing one. -noencSkips encryption of the private key. Prevents OpenSSL from prompting for a passphrase when using the private key.
Use this only if you are comfortable storing the CA private key unencrypted.-key mtls-ca.keySpecifies the private key file to use. Uses mtls-ca.keyas the private key associated with the new CA certificate.
Change this to the name of your CA private key file if different.-sha256Uses SHA-256 as the message digest algorithm for signing. Signs the certificate using a SHA-256 hash, which is a widely accepted secure algorithm. -days 3650Sets the certificate validity period in days. Makes the CA certificate valid for 3,650 days (approximately 10 years).
You can change this duration if you want.-out mtls-ca.pemSpecifies the output certificate file. Writes the generated CA certificate to mtls-ca.pem.
Change this to your preferred certificate filename if desired. But know that this tutorial assumes you named it this way.-subj "/C=US/O=YourOrg/CN=relay-mtls-ca"Specifies the certificate subject non-interactively. Sets the certificate's Distinguished Name (DN) without prompting for input. In this example, the country is US, the organization isYourOrg, and the common name isrelay-mtls-ca.
Replace these values with your desired information.\Shell line-continuation character (not an OpenSSL option). Allows the command to be split across multiple lines for readability while being executed as a single command. openssl req -x509 -new -noenc \
-key mtls-ca.key \
-sha256 \
-days 3650 \
-out mtls-ca.pem \
-subj "/C=US/O=YourOrg/CN=relay-mtls-ca"
chmod 644 mtls-ca.pemThis will create a file called
mtls-ca.pem, which is your new CA certificate. It is an X509 certificate, which you specified in that command when you ranopenssl req -x509... -
Create your relay server's private key
openssl genrsa -out relay.key 4096
chmod 600 relay.key -
Create a CSR (Certificate Signing Request) configuration file
- Create a file called
relay.req.confand copy/paste these contents to that file. - Be sure to replace "YourOrg" and "example.com" and the entries under
alt_namesto match what you want them to.
[req]
distinguished_name = req_distinguished_name
req_extensions     = req_ext
prompt             = no

[req_distinguished_name]
C  = US
O  = YourOrg
CN = lr.example.com

[req_ext]
subjectAltName = @alt_names

[alt_names]
DNS.1 = lr.example.com
DNS.2 = wazuh-relay.example.com - Create a file called
-
Generate the CSR for your relay server
openssl req -new \
    -key relay.key \
    -out relay.csr \
-config relay.req.conf -
Sign the relay's certificate
openssl x509 -req \
    -in relay.csr \
    -CA mtls-ca.pem \
    -CAkey mtls-ca.key \
    -CAcreateserial \
    -out relay.crt \
    -days 825 \
    -sha256 \
    -extfile relay.req.conf \
    -extensions req_ext
chmod 644 relay.crt -
Create your relay server's "PEM bundle"
NOTEA "PEM bundle" is a file with a
.pemextension that combines a certificate and a private key. This is useful because some tools/services, like the ones we'll be using in this guide, require both to be bundled into a single file.cat relay.crt relay.key > relay.pem
chmod 600 relay.pem
Congratulations! If you followed the steps outlined above, you should now have a Certificate Authority ready to use.
Make sure it all worked
Before we move on, let's quickly stop to make sure you've done everything correctly so far. You should have all of the following files:
| Filename | Description |
|---|---|
mtls-ca.key | CA private key |
mtls-ca.pem | CA certificate |
mtls-ca.srl | Certificate serial number file created by OpenSSL |
relay.key | Relay server private key |
relay.req.conf | CSR configuration file |
relay.csr | Certificate Signing Request |
relay.crt | Signed relay certificate |
relay.pem | Combined certificate and private key bundle used by Stunnel and related services |
If those all look good, it's a good idea to verify that all your certificates were created correctly and that your relay certificate was properly signed with the Certificate Authority (CA) you just created.
Verify the CA Certificate
Display information about your CA certificate:
openssl x509 -in mtls-ca.pem -text -noout
You should see information similar to:
Issuer: C=US, O=YourOrg, CN=relay-mtls-ca
Subject: C=US, O=YourOrg, CN=relay-mtls-ca
Because this is a self-signed CA certificate, the Issuer and Subject values should be identical.
Verify the Relay Certificate
Display information about your relay certificate:
openssl x509 -in relay.crt -text -noout
Verify that the certificate contains the hostname you specified:
Subject:
    C=US
    O=YourOrg
    CN=lr.example.com
Also verify that the Subject Alternative Name (SAN) section contains the DNS names you configured:
X509v3 Subject Alternative Name:
    DNS:lr.example.com
    DNS:wazuh-relay.example.com
If the SAN section is missing, clients performing hostname verification may reject the certificate.
Verify That the Relay Certificate Was Signed by Your CA
Run:
openssl verify -CAfile mtls-ca.pem relay.crt
Expected output:
relay.crt: OK
If you receive any errors, verify that:
- You used the correct CA certificate.
- The relay certificate was signed using the corresponding CA private key.
- The CA and relay certificate files were not modified after creation.
Verify the Certificate Chain
You can also confirm that the relay certificate's issuer matches your CA:
openssl x509 -in relay.crt -noout -issuer
openssl x509 -in mtls-ca.pem -noout -subject
The issuer reported by relay.crt should match the subject reported by mtls-ca.pem.
If all of the checks above succeeded, congratulations! Your Certificate Authority and relay server certificate are all looking good, and you're ready to move onto the next step.
If anything above didn't look right, don't worry! Just go back through the steps carefully and read each step thoroughly to make sure you didn't miss something.z
Step 2 - Set up HAProxy to relay logs from your monitored devices to Wazuh
Now, we'll set up HAProxy. This service will perform the dual function of authenticating clients wanting to connect to the Wazuh server and forwarding logs to the server.
Putting HAProxy in between clients and the Wazuh server this way helps reduce the risk of your server being overwhelmed or compromised. If you were to expose your SIEM directly to the rest of the world, an attacker might try perform a denial of service attack by overwhelming the server with traffic. Or, they might attempt to send fake logs to the server to hide normal activity.
So, let's see the setup steps.
-
Pick a place to install it
- HAProxy needs to run on a server somewhere, so that could be a physical or virtual machine. To preserve the goal of separation, it shouldn't be running as a service on the same machine or operating system that's running your Wazuh server. So, you might create a lightweight VM to run this service. Once you have one installed, proceed to the next steps.
-
Install HAProxy
- This guide assumes you're using an OS with the
aptpackage manager. If not, adjust commands to match your package manager.
sudo apt update
sudo apt install -y haproxy - This guide assumes you're using an OS with the
-
Install the certificates you created in Step 1
NOTEFirst, you'll need to find a way to get your certificates onto the server that will host HAProxy. Do this whatever way works best for you, such as by using SCP (Secure Copy) or with a USB stick.
All you need to do is copy the files you created in the previous steps (
relay.pemandmtls-ca.pem) to the server that will host HAProxy. One you have them copied to the server, use the following commands below to organize them.sudo mkdir -p /etc/haproxy/certs
sudo chmod 700 /etc/haproxy/certs
sudo cp relay.pem mtls-ca.pem /etc/haproxy/certs/
sudo chmod 600 /etc/haproxy/certs/relay.pem
sudo chmod 644 /etc/haproxy/certs/mtls-ca.pem -
Configure HAProxy Modify the file
/etc/haproxy/haproxy.cfgand add the following contents at the bottom of the file, making sure to replace<WAZUH_MANAGER_IP>with the IP address of your Wazuh server:frontend wazuh_agent_1514_in
bind 0.0.0.0:1514 ssl crt /etc/haproxy/certs/relay.pem ca-file /etc/haproxy/certs/mtls-ca.pem verify required
mode tcp
option tcplog
timeout client 2m
default_backend wazuh_manager_1514
backend wazuh_manager_1514
mode tcp
timeout server 2m
server wazuh_manager <WAZUH_MANAGER_IP>:1514 check -
Validate the configuration and reload HAProxy
sudo haproxy -c -f /etc/haproxy/haproxy.cfg
sudo systemctl reload haproxy
If the results of the first command in the last step returned "Configuration file is valid" and you were able to successfully restart the haproxy service, you should now have a functioning HAProxy log relay!
This relay is configured to do the following:
- Handle mTLS authentication by validating the identities of clients wanting to connect to the Wazuh server
- Attest to its own identity when clients attempt to validate it
- Forward logs from successfully authenticated clients to the Wazuh server on port 1514
Step 3 - Configure DNS and Networking
This relay should be publicly accessible so you can receive logs from your monitored devices wherever they go. The steps to set that up will depend on where you're hosting this relay. If you're hosting it at home, for example, you may want to set up port forwarding at your firewall to forward traffic on TCP ports 1514 and 1515 to the log relay.
This next step is where it's really helpful to own your own domain. Once you have that, it makes it really easy to tell your devices where to send their logs. Keep in mind that you won't be able to do this last step the way I recommend if you don't have that.
Next, you will want to configure an entry with your DNS provider to give your log relay a URL so you can more easily tell your devices where to send their logs. For example, you could set "lr.yourdomain.com" to point to your log relay's public IP address, and you're good to go!
You're now ready to move onto part 2 of this tutorial, where you'll learn how to connect a client (also known as an "agent") to Wazuh through your log relay.